First Steps | How to Play The Flute With 8 Best Tips

Never too late to learn how to play the flute! Follow these tips and you’re on your way to creating beautiful music with this elegant instrument. Good posture and technique will allow for beautiful tones — make sounds with quick fingers nimble enough for flute-playing!
Be flexible as you explore to discover which methods best suit you while having fun while learning this unique musical artform — happy playing!
At What Age Start Playing Flute
No matter your age or life stage — now is always a good time to pick up the flute! Don’t allow anything or anyone to derail you from your musical dreams!
From those in their 50s or 60s to adults just getting started playing music — learning this amazing instrument shouldn’t be daunting! Don’t wait for an ideal opportunity — now is always a good time to follow your passion of playing an instrument! Don’t put off giving this your full attention; go do it now!

Start small — master proper breathing techniques and holding the flute correctly as we cover its basic fundamentals of how to play the flute!
Children as young as 6 or 7 can learn the flute with basic instruction, and as their skills and understanding of music theory mature — they can progress onto more challenging pieces.
Consider Why You Want Play Flute
If you are considering taking up flute playing — there are a couple of key considerations you need to remember when starting: Why would you like to learn it and can you commit enough practice time each day?
Knowing why and maintaining commitment will guide your actions in the appropriate directions.
Learning flute can bring many rewards! From playing an array of music genres and jamming with other groups to a small portable size that makes finding teachers easy — learning this instrument opens doors!
No matter the goal – be it listening to favorite tunes, socializing with peers or simply doing personal hobbies — knowing your motivations are critical for a fulfilling experience.
Start With a Student Model Concert Flute
Flute learning should not be hindered by having an unusable instrument! Explore different models until you find one that meets all your criteria — this ensures a pleasant learning journey!
New flutists typically purchase used flutes in order to save money — these flutes may need repairs and can prove extremely frustrating when trying to produce quality sound production.
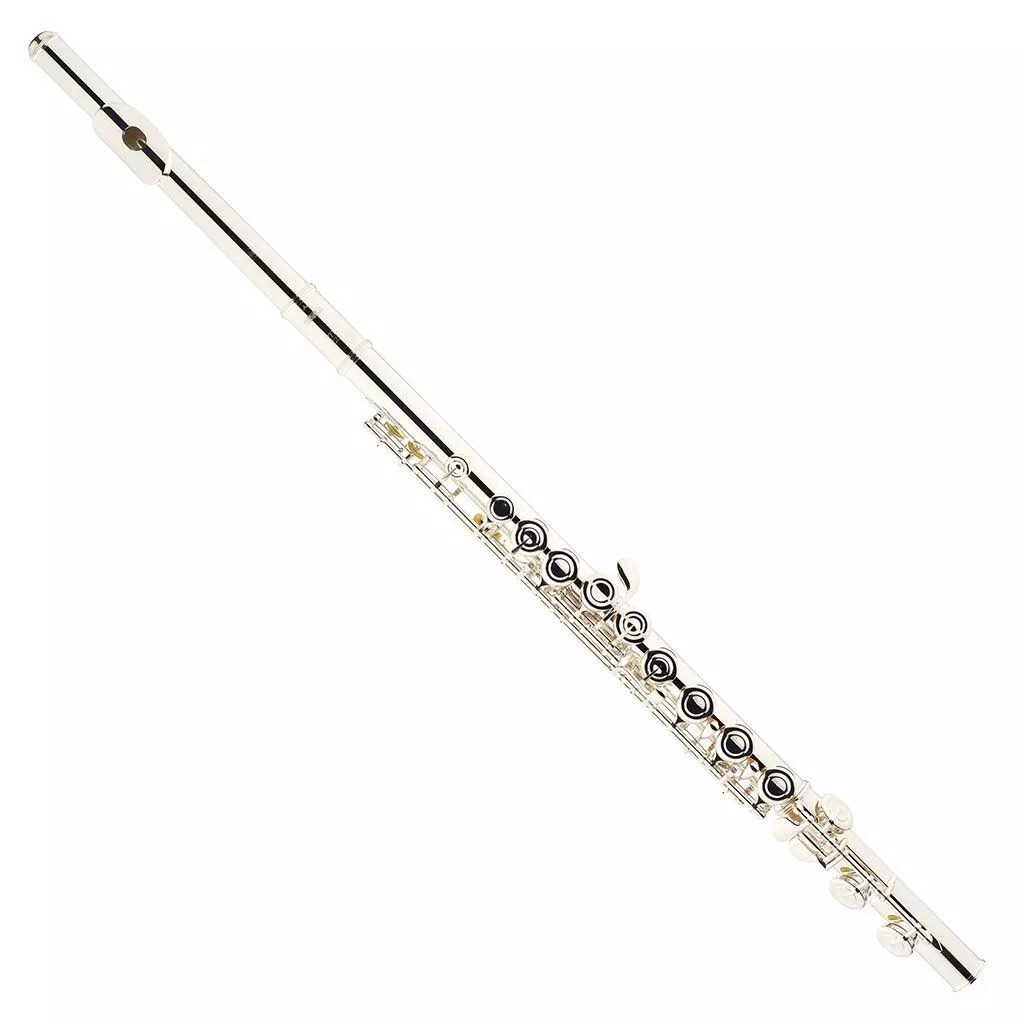
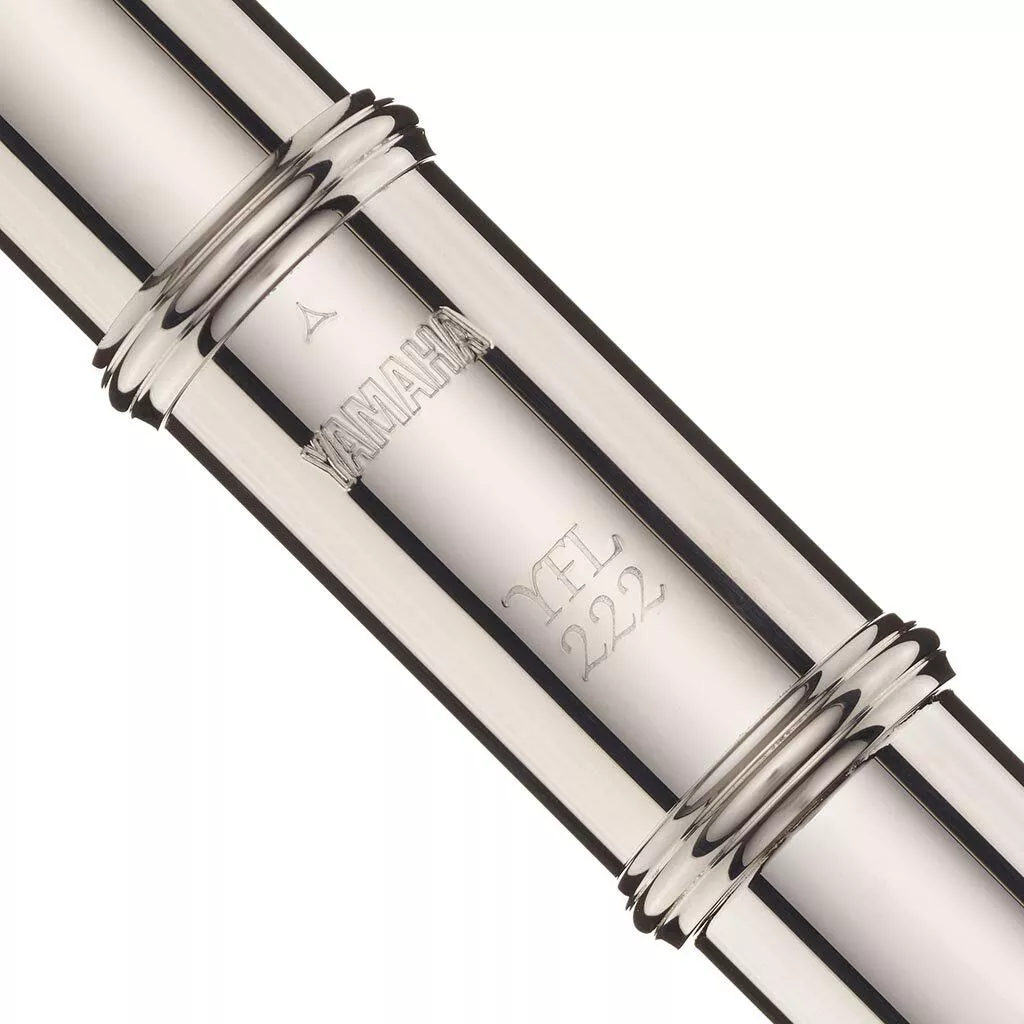
Yamaha YFL-222
- Beginner Yamaha flute
- Traditional Europian pointed key arms
- Optional curved head joint for easier hold and play
- C foot joint
- Offset G key
- Closed key holes
- Nickel silver body and headjoint
Pricing
Yamaha YFL-222 Flute for Beginners
Check out our post of The Top 9 Student Flutes to discover which models are among the most-wanted!
Starting to play flute requires finding an affordable instrument of high-quality — there are plenty of affordable solutions out there available just for beginner flutists.
Consider purchasing your new student flute from a trusted music brand. While cheaper flutes might tempt you — their quality cannot always be trusted and investing in one from such an established provider can pay dividends over time.
Get Familiar with Flute Parts
Understanding its components is vital in order to fully explore complex techniques and embrace your individual sound — maximize your learning journey with the flute.
Take proper care of each component — familiarize yourself with all its parts, and become the master of this exquisite instrument!
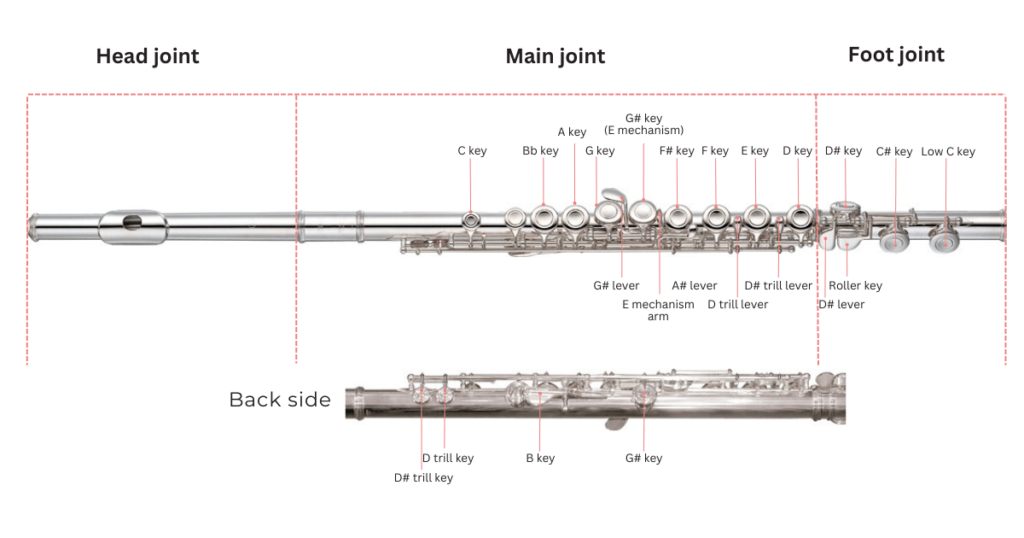
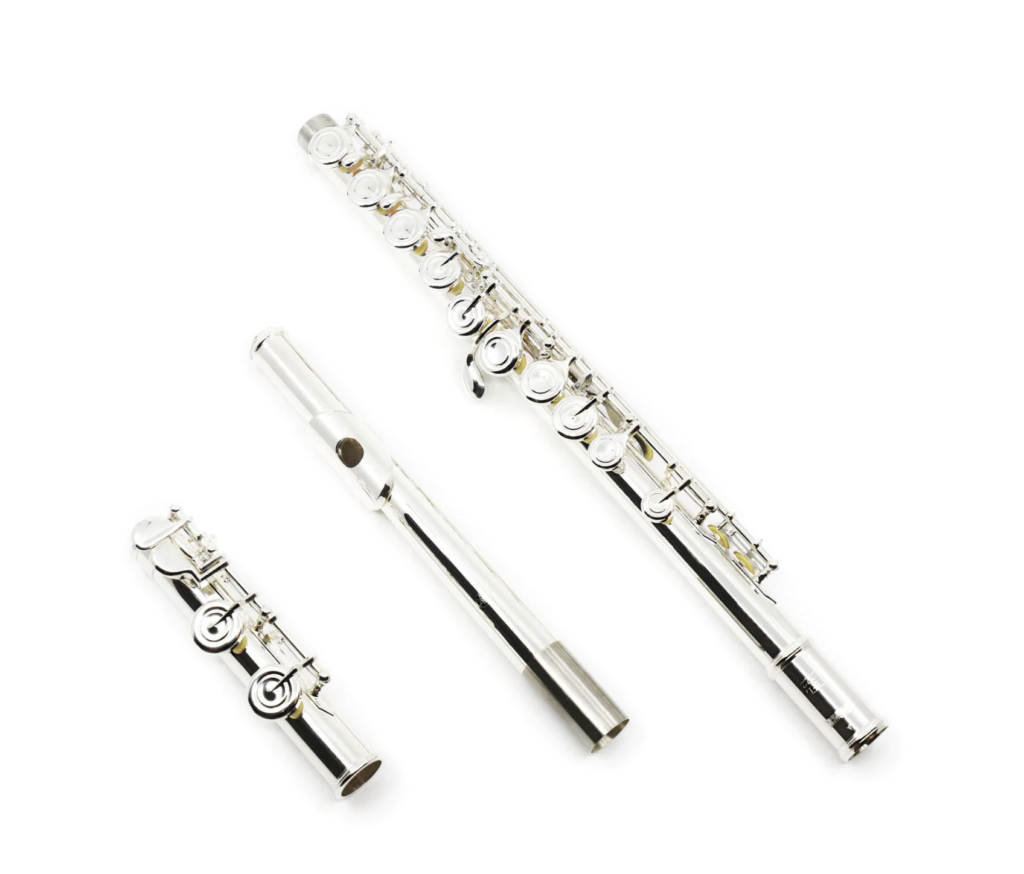
A flute has three main sections — head joint, body and foot joint.
The head joint features an embouchure hole to produce clear tones; the body adds resonance and color and its keys control airflow/pitch; the foot joint emits sound while additional keys may exist depending on flute type.
Create sound by blowing air into the head joint and vibrating lips on the lip plate.
Are you curious to explore more deeply the components of the flute? Check out our Flute Anatomy Guide — it details all essential flute components.
Flute Assembly
Assemble your concert flute (different from bass flutes) by carefully sliding its head joint into its body until a snug fit has been attained — take special care not to grab onto any keys that might damage it.
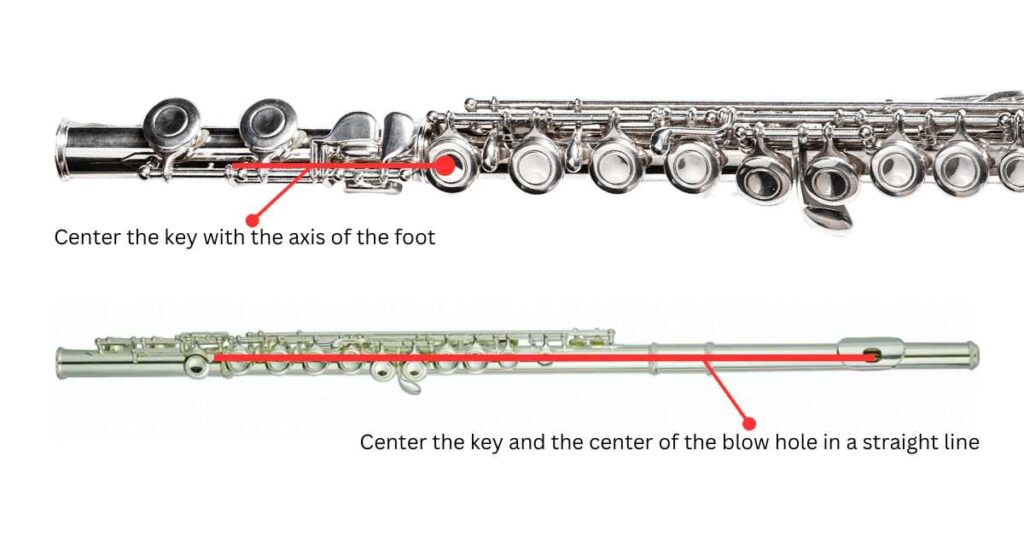
Aligning the flute head joint hole with its body’s first key and turning its head joint so that its mouth hole aligns with the key. Hold up the flute up to your eyes to check that its hole abuts the body — this alignment ensures a full rich tone when playing.
Then, insert the foot joint so its metal pin aligns with the keys on both ends. Twist securely against its main body and make sure its long metal pin lines up with the bottom key on the body. Tighten this component down securely against its main body — be careful that the long metal pin aligns properly against bottom keys!
To tune your flute — use a chromatic tuner or tuning app. Play one note at a time and adjust if it seems high or low by twisting and pulling your head joint; pressing in on it if it is too low — keep doing this until your flute is perfectly tuned!
How to hold a flute properly – The Right Posture Is Important!
Learn the appropriate hand position when playing flute to improve finger speed and technique.
Holding the flute correctly and balancing its weight is not just for aesthetic reasons — it prevents long-term injuries to your neck, shoulders and arms.
Use your left hand to control keys close to the head joint of the flute. Place your thumb on the first key at the bottom with your palm facing you; wrap your fingers around the opposite side.
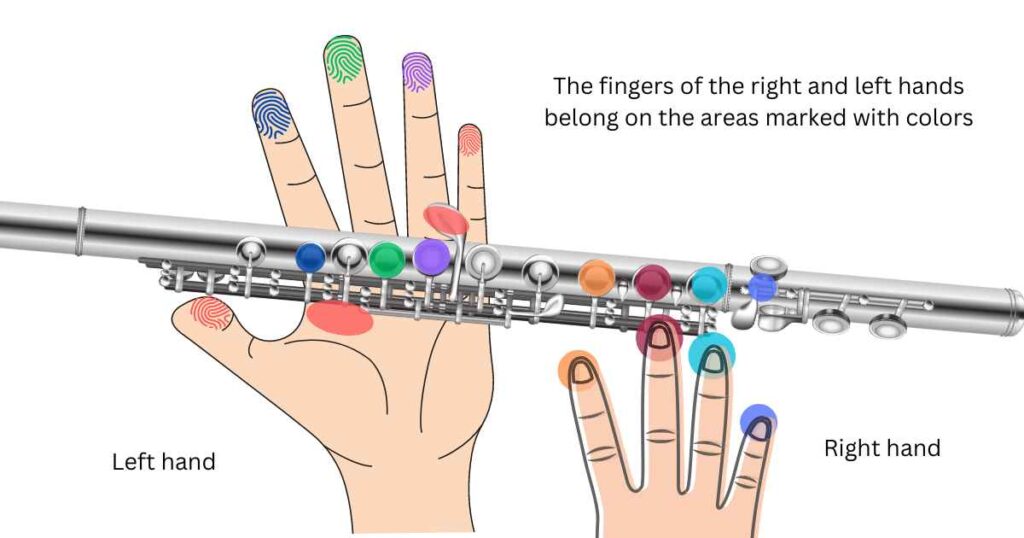
Position the left index finger, middle and ring fingers respectively on the 2nd, 4th and 5th keys with the pinky resting on the side paddle key (this should take no more than five or ten steps!). Let pinky rest comfortably against the paddle side key!
Use your right hand to manipulate the keys at either end while supporting their bottom with your thumb. Place your right index finger, middle and ring fingers onto the last three keys in the flute’s main body before using pinky to press #1 key of the foot joint — keep fingers curled into a C shape on top of the keys without pressing them down!
Here’s the key — bring the flute directly to yourself without sticking your chin out. Position the flute parallel with the floor while slightly angled downward — be mindful of relaxing both shoulders and elbows while holding up and playing your flute!
Quick Tip: Sit comfortably on the edge of a chair with back straight and flute in hand and lift to mouth while making sure arms remain relaxed and at your sides.
Handing is irrelevant when playing flute — no “left-handed flute” should exist.
Develop Proper Embouchure
In order to produce the optimal sound when playing flute, ensure the hole sits under the center of your bottom lip for maximum alignment and support — this ensures maximum tone is generated during performances!
Maintain correct lip posture by tightening the muscles at the corners of your mouth while relaxing your lips. Blow air from the middle of your lips towards the hole — slightly open your mouth and exhale a controlled stream of air for note creation.

Position the blow hole on the lower lip, adjust the aperture with mirror alignment and set the head joint so as to maximize tone by splitting the air stream. Blow air across (not into) the embouchure hole until a sound can be produced. Adjust its angle until that occurs.
Gently blow over the top while maintaining balanced lips. Stretch parallel lips out forming a small hole known as the lip aperture. Start off by producing an audible “pooh” sound to form an embouchure with stability and relaxation.
Adjust the position of your jaw accordingly without opening too wide — achieve an audible and sustained sound for 5 to 10 seconds.
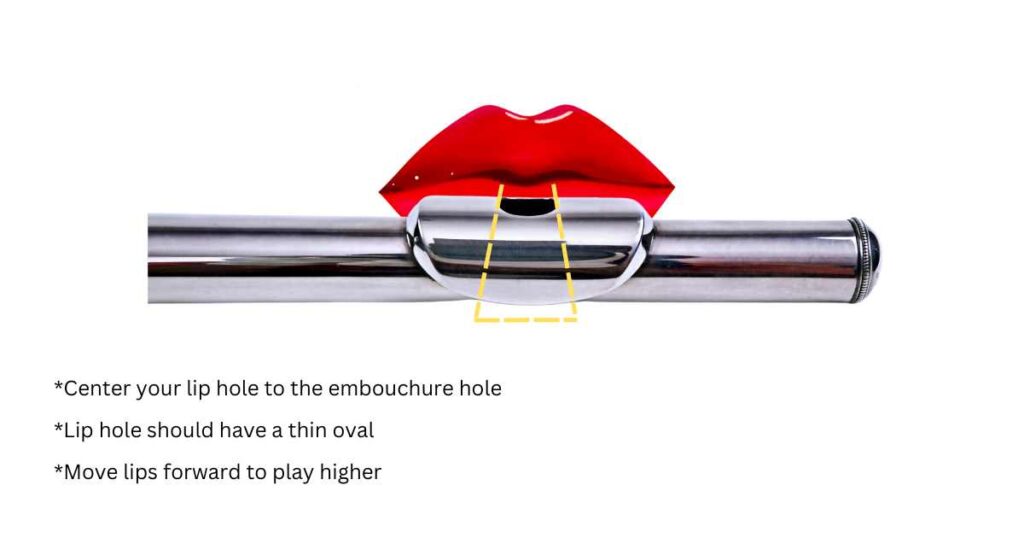
Adjust the airspeed and embouchure opening size accordingly in order to produce various notes — practice until you master control!
Exhale slowly for lower notes while exhaling quickly with tightened mouth corners (for higher notes) — keep trying and you will succeed!
Play With Just the Head Joint
To practice embouchure on the flute, start off by practicing on just its head joint (before transitioning onto using an entire instrument.) Proper placement ensures a clear and full sound — incorrect positioning could result in distortion.
Hold it loosely with one hand — cover its end with your other. Blow over the blowhole to create sounds similar to blowing on a glass jug. Experiment by covering and uncovering its end.
Without keys to be concerned with, beginners can concentrate on developing good airflow. It is easier to hold the headjoint and beginners decrease any risk of falling flutes — most beginning players can produce sound within one or two days of practice with persistence and practice.
Get acquainted with your headjoint before adding body — this will ease the transition.
Add The Foot and Body Joint When Ready
Master the headjoint’s tone before moving on to learning how to operate its keys on a flute.
If you want to develop your flute skills, practice producing smooth and steady sounds for 5-10 seconds at a time before assembling the flute and covering all holes or just left-hand holes. With regular practice — you will become proficient!
Assemble a flute by first connecting its body and footjoint once you can produce sound — practice just with its body joint(leaving out the footjoint) for weight-cutting purposes and learning initial notes. As you progress along, master fingerings to deepen understanding.
Learn Flute Fingering Chart
Beginner flute students need not begin by learning fingerings alone as their primary objective…
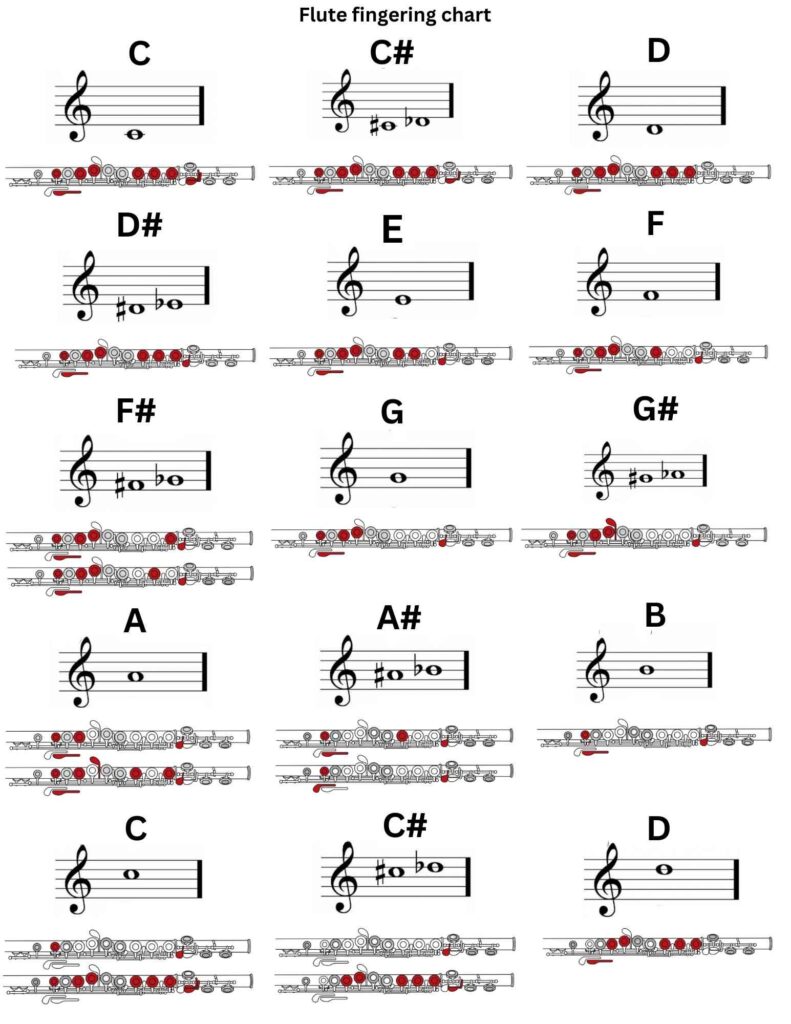
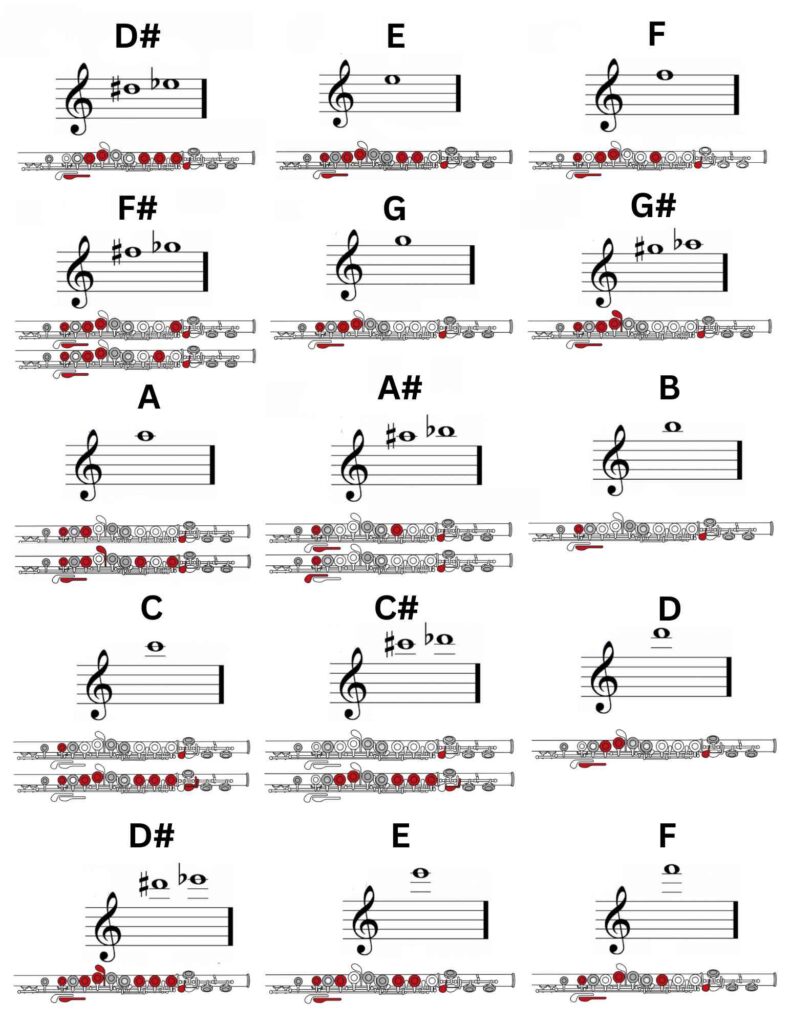
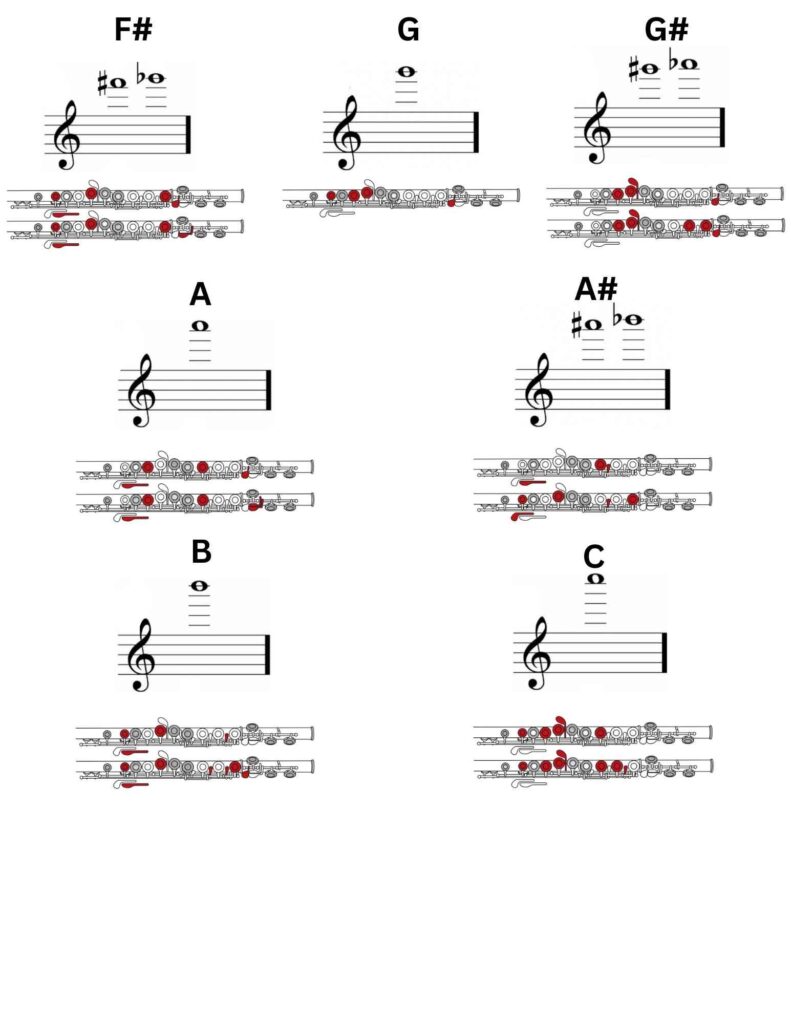
Fingering charts provide an effective tool for learning various notes on flutes. They clearly display which fingers should press upon various keys — filled circles indicate when pressing is required; white circles represent open keys…
Download the C flute fingering chart in PDF
Start out on “D” by playing its note — engage all fingers at once and maximize finger usage.
Follow a fingering chart when learning flute notes so you can become adept at switching between them more seamlessly — double-check fingerings regularly so you stay accurate without developing bad habits…
Many flute books include fingering charts that will aid your learning. Print one and keep it close by on your music stand while practicing to play flute!
Check out our post for more details — grab our PDF Flute Fingering Charts!
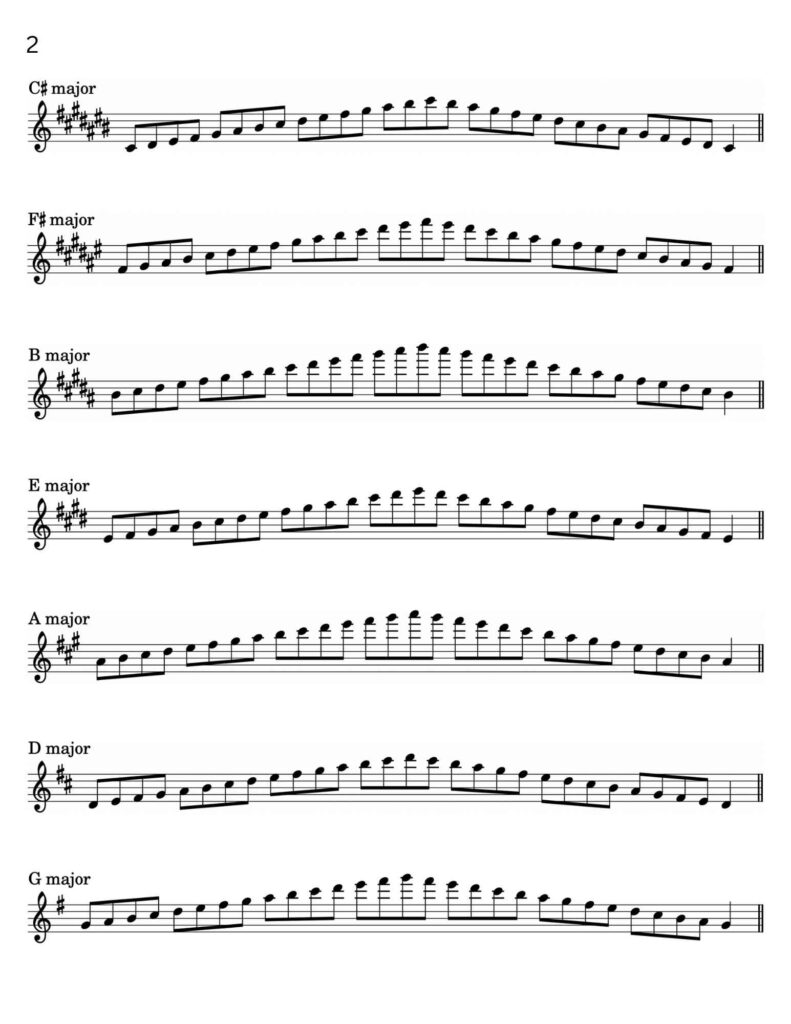
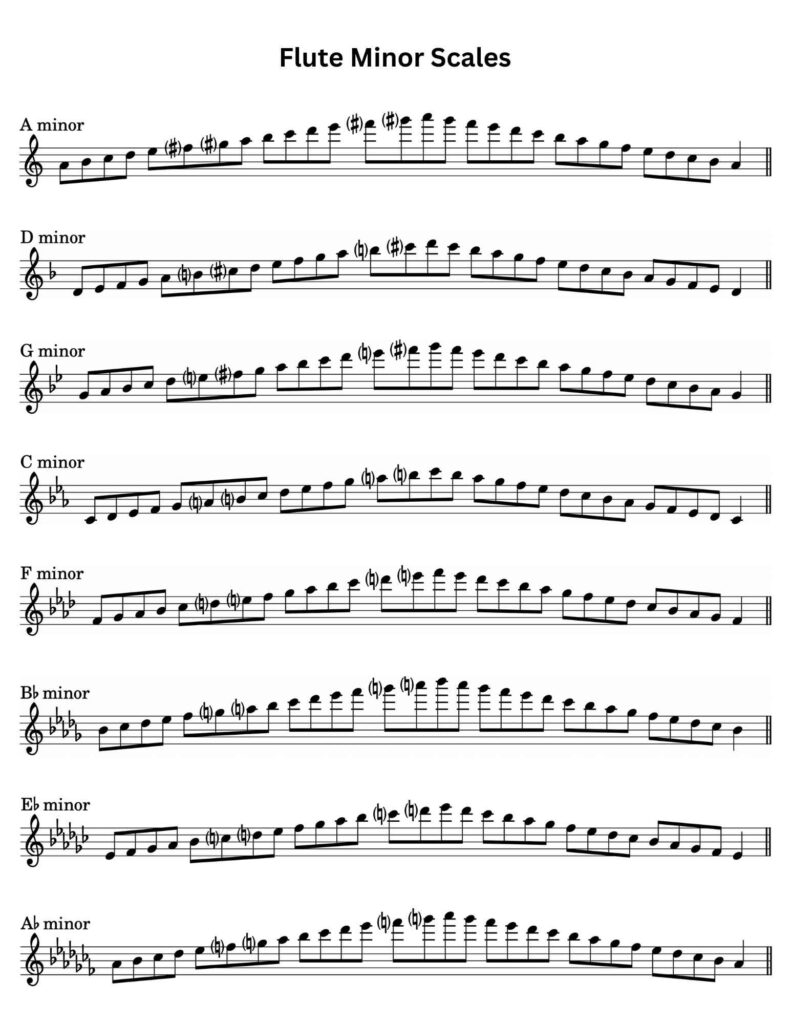
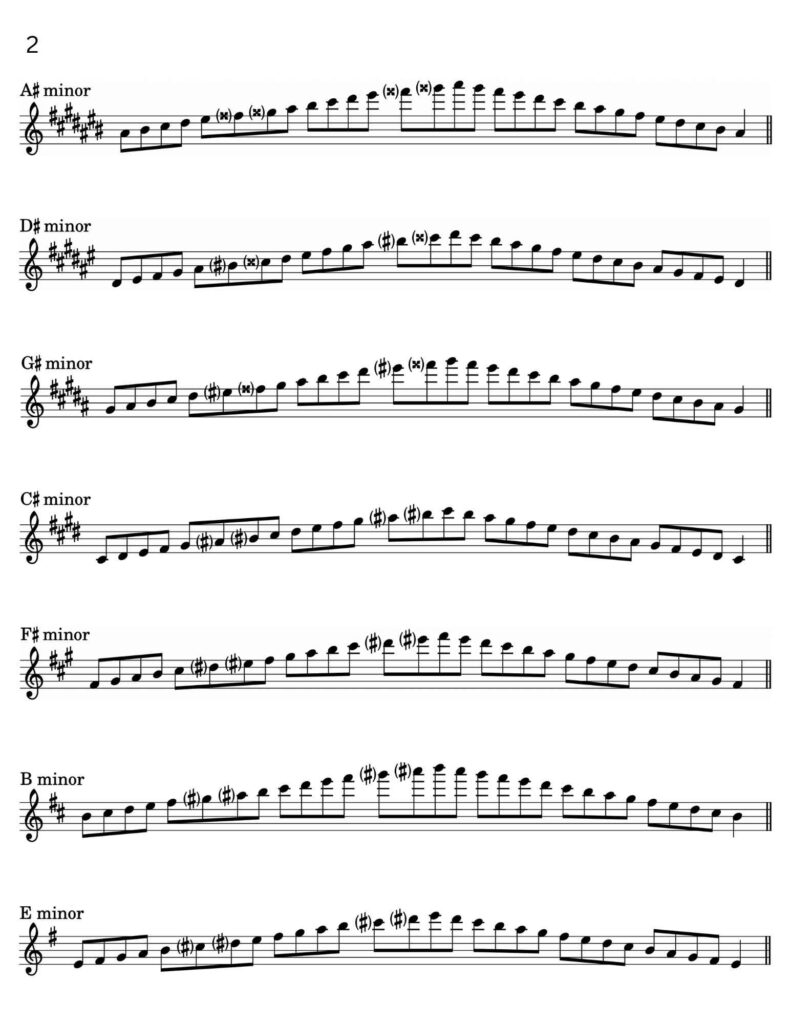
Learn Flutes Scales
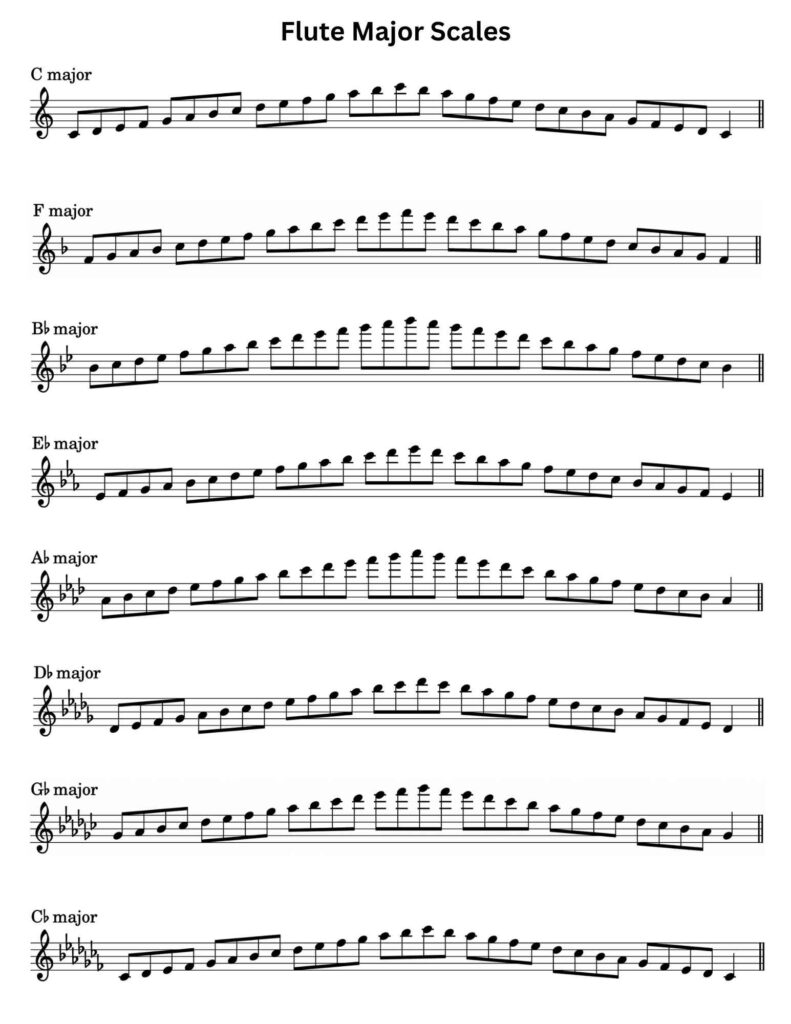
When learning flute scales, take your time (no need to rush…) and listen carefully so as to ensure accurate note playing.
Scales give insight into your instrument’s range and capabilities while serving as a basis for understanding musical notation and theory — plain handy to have around!
Fingering charts for the flute offer multiple alternate fingering… Learn to finger every note within an octave!
Start by memorizing just a few notes, then gradually introduce new ones one at a time. Allow yourself ample time and practice each step until you master all twelve notes of the scale — you’ll have no difficulty playing an entire chromatic scale on the flute!
Use a metronome to become adept at playing in time and maintaining an even tempo. Once you have learned the “C” scale — consider sight reading as well as playing some tunes!
Buy Musical Instrument of a Reputable Brand
Learning to play the flute can be an incredible journey and having an instrument of high quality makes a difference! Opt for trusted brands crafted with care — they guarantee high-grade instruments to give you peace of mind!
When learning flute — it’s wise to purchase from a reliable brand. This ensures a quality instrument with amazing sounds. Before purchasing any instrument online — research or consult experienced players for advice.
Be wary when buying flutes online from third-party sellers such as Amazon… Stick with trusted flute brands or music stores that specialize in providing reliable instruments — some stores may even provide repair services for preexisting flutes that need refurbishing or fixing up!
Check out our latest post to learn about The Top 13 Flute Brands!
8 Important Tips:
1 Always Clean Your Flute After Every Play Session
Gently unscrew and clean the flute after every use, attaching a cloth to its cleaning rod for best results. Wrap this fabric around each section (to remove moisture…) while twisting to ensure thorough cleaning; wipe down outside with cloths while being careful around key pads.
Use cotton swabs in hard-to-reach spots as you go and be cautious — do not damage its integrity!
2 Find a Flute Teacher
Find a teacher who understands both — your learning style and needs to help facilitate flute improvement.
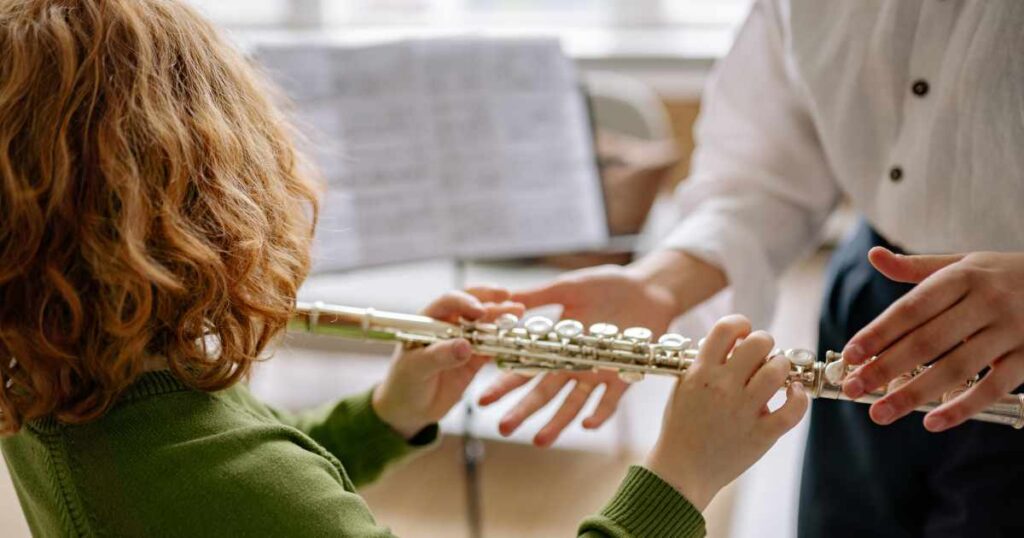
Group and private lessons have their own sets of benefits and drawbacks — both provide invaluable lessons on embouchure, breathing techniques and posture.
3 Everyday Practice is The Best
Daily practice will help improve technique, tone quality, sound dynamics and note accuracy. Plan time each day to play your flute and work toward honing your skills.
Create a consistent practice regimen — remain motivated and continue progressing forward. Doing this will allow for maximum motivational gains as well as progression over time.
4 Practice Playing Sheet Music that Speaks to You
Playing something you enjoy will only increase engagement and help improve flute skills. Listening or watching recordings of pieces before performing them helps gain more of an understanding of tempo, dynamics and style.
Select pieces that challenge (but still fall within your skill level…) — so you can work toward mastering them without becoming disheartened by them.
Check out our post for some Free and Easy Flute Sheet Music – Disney, Christmas and Beginner Solo pieces are waiting just for you! Check it out now!
5 If You aren’t Playing Flute Regularly — Store it Safely Within its Case
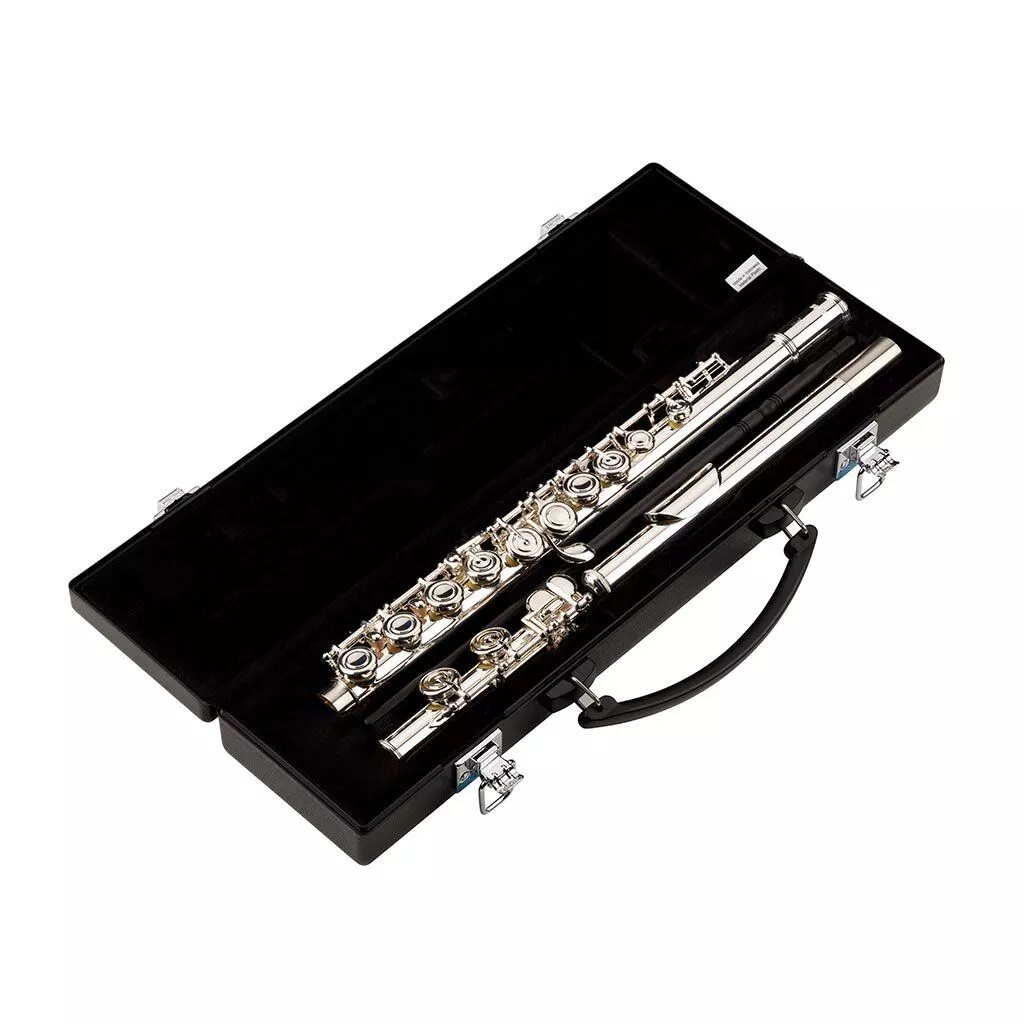
Keep your flute safe by placing each component securely inside its case to avoid potential damages and do not store damp cleaning cloths within to reduce tarnishing — keep your instrument looking its best!
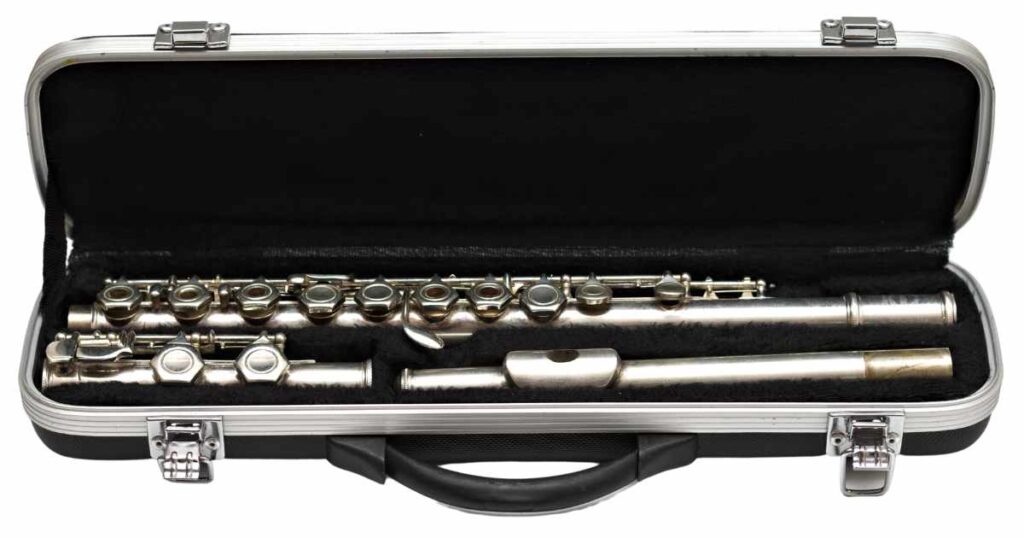
Store your flute in an enclosed space like a closet, under your bed or an area with minimal traffic flow — being careful to not hit or bump its case. Preserve its condition as well — keep away extreme temperatures that could harm its mechanics, pads or cork.
6 Perform a Short Warm-Up Routine
Stretching and breathing exercises not only relax your body — they can help put you into an appropriate mindset for practicing or performing well. Starting simple can help wake up your fingers to play flute again!
7 Access tutorials and obtain a Method Book or take online lessons
Method books and online lessons (Learn Flute Online is one of the best!) provide great resources for honing flute skills. From learning the fundamentals like breath control, articulation and technique — all can provide essential knowledge on honing one’s flute proficiency.
8 Don’t Push Too Hard on Yourself
Learning how to play the flute requires hard work and perseverance — don’t be too harsh with yourself when making mistakes or not being immediately adept. Mistakes are part of learning — take breaks (when needed…) but keep practicing!
Extra tip — Avoid Cheap Flutes
Cheap flutes may come equipped with subpar pads and keys that make playing difficult or uncomfortable — investing in an excellent-quality instrument could prove instrumental to your growth as an artist.
How to Play the Flute: Conclusion
Learning how to play the flute can be rewarding — both for newcomers and experienced musicians alike. Try following these 8 awesome tips for making beautiful music on your flute — from beginner techniques all the way up to advanced skills like tone production. Grab your flute, take a deep breath and let’s create beautiful music together!

