
Free Flute Fingering Chart PDF — Best Beginner’s Guide 2026
Looking for a flute fingering chart to improve your playing?
You’re in the right place! Whether you’re just starting out or already have experience, a flute fingering chart PDF is essential. It shows you exactly where to place your fingers for each note.
This beginner’s guide covers everything you need to know. You’ll learn what fingering charts are and why they matter. Plus, I’ve included a free printable PDF chart!
I also provide major and minor scales. These help you start practicing right away. Think of this as your roadmap to becoming a skilled flutist!
By the way, check out these “Seven Free Daily Flute Warm Ups PDFs” that will transform your playing!
With the right fingering chart, learning becomes much easier. Let’s get started on your musical journey!
C Flute Fingering Charts
A flute fingering chart is a must-have tool for every flute player. It shows you exactly where to place your fingers for each note.
I think this visual guide makes learning so much easier. The chart displays clear diagrams of finger positions. You can see which keys to press for every note on the flute.
Download The C Flute Fingering Charts In PDF
These charts help beginners learn faster and build confidence. You’ll memorize finger patterns more quickly with a visual reference. In my experience, students who use fingering charts progress much faster.
You can practice different fingerings for various musical situations. This helps you play more smoothly and accurately. A good fingering chart becomes your reliable practice companion.
Whether you’re just starting out or refreshing your skills, a fingering chart guides you. It takes the guesswork out of learning new notes.
How to Use Flute Fingering Chart PDF
Step 1: Find Your Note on the Staff
Start by looking at the fingering chart. Find the note you want to play on the musical staff.
The chart shows each note’s name. It also displays how the note appears on the staff. This visual reference makes learning much easier for beginners.
Step 2: Match the Note to Finger Positions
Once you know your note’s name, check the fingering diagram. The chart shows exactly which keys to press down.
Each diagram displays the flute keys in their actual positions. Black or filled circles mean “press this key.” White or empty circles mean “leave this key open.” It’s like following a simple map for your fingers.
Step 3: Position Your Fingers Correctly
Place your fingers on the flute keys as shown. Your fingers should rest comfortably over each key.
Don’t press too hard or too soft. Apply gentle, steady pressure to create a clear sound. Good hand position prevents strain and improves your tone quality.
Step 4: Practice and Explore Alternate Fingerings
Play each note repeatedly using the chart as your guide. Build muscle memory through consistent practice.
Many notes have alternate fingerings listed on the chart. These alternatives help with tricky note transitions. (Different fingerings work better for different musical passages.) Try each option to find what sounds best.
Experiment with switching between standard and alternate fingerings. This skill improves your overall playing flexibility.
Piccolo Fingering Chart – Understanding Piccolo Fingerings
The piccolo belongs to the flute family. Many standard flute fingerings transfer directly to piccolo playing. However, the piccolo starts on D instead of C. (Most models cannot play the lowest flute notes.)
Basic fingerings remain identical between both instruments. But piccolos need more alternate fingerings for proper intonation.
Beginners should master standard fingerings first. Experienced flute players will already recognize most fingering patterns.
Download The Free Piccolo Fingering Chart PDF
The first octave may sound airy at first. Practice helps develop a clear, beautiful tone in this register.
Players use the second octave most frequently. Fingerings stay consistent, and air control adjusts the pitch.
The third octave produces the piccolo’s brightest, highest notes. (This range extends beyond standard flute playing.)
More alternate fingerings appear in this register. Forked fingerings become essential for intonation and technical passages. Alternate fingerings help correct sharp or flat notes. They also make difficult passages easier to play smoothly.
Every piccolo model plays slightly differently. Test fingerings with a tuner on your specific instrument.
Mastering Flute Scales with Your Flute Fingering Chart
Scales form the foundation of all music. They help you build finger strength and develop smooth technique. Regular scale practice is one of the best ways to improve your flute playing.
Learning scales teaches you to switch between notes seamlessly. You’ll also develop better pitch control and intonation. These skills are essential for every flutist. They prepare you for learning new songs and pieces. When you know your scales well, reading music becomes much easier.
Most scales fall into two main groups: major and minor. Major scales create bright, happy sounds in classical and pop music. Minor scales produce darker, more emotional tones. (You’ll hear both types in almost every musical style.)
Your flute can play many different scale types. Major and minor are the most common ones. You can also learn chromatic scales and other variations.
Scale practice benefits flutists at every skill level. Beginners build fundamental technique through daily scale work. Advanced players use scales to maintain precision and tone quality.
Major Scales
Major scales are the backbone of Western music theory. They’re absolutely essential for developing flute technique — practicing major scales improves your tone, control, and overall sound quality.
Each major scale contains seven different notes or pitches. The eighth note repeats the first note one octave higher. This pattern creates the familiar “do-re-mi” sound.
C Major is the simplest scale to learn first. It uses the notes C-D-E-F-G-A-B-C with no sharps or flats. This makes it perfect for beginners learning fingering patterns.
Download Free C Flute Major Scales in PDF
Start practicing slowly with one-octave scales. Make sure each note sounds clear and in tune. Focus on producing a consistent, beautiful tone throughout.
Build your speed gradually as you gain confidence. Never sacrifice tone quality for faster playing. (Speed will come naturally with consistent, careful practice.)
Proper breathing is crucial when playing scales smoothly. Take full breaths and maintain steady air pressure. This helps you produce an even sound across all notes.
Regular practice builds muscle memory in your fingers. Your transitions between notes will become automatic over time. Even 10-15 minutes per day can make a difference!!
Work your way up to two-octave scales eventually. Start with comfortable tempos and increase speed slowly. Consistency matters more than long practice sessions.
Minor Scales
Minor scales use a different pattern of intervals than major scales. The specific sequence creates their characteristic darker sound. This interval pattern is: whole step, half step, whole step, whole step, half step, whole step, whole step.
A natural minor scale is a great starting point. It begins on A and includes B-C-D-E-F-G-A. Notice there are no sharps or flats in this scale.
Download Free C Flute Minor Scales PDF
Compare A minor to C Major on your fingering chart — you’ll discover they use the exact same notes! The difference lies in which note serves as home base.
Practice minor scales with different rhythmic patterns for variety. Try using a steady waltz rhythm at first. Then experiment with swing rhythms using eighth-note triplets.
Varying your practice routine keeps things interesting and challenging. Different rhythms develop different aspects of your technique. They also prepare you for a range of musical styles.
Use your flute fingering chart PDF to map out minor scales. Clearly mark the finger positions for each note — this visual reference speeds up your learning!!
Two-octave minor scales require more breath control and stamina. Gradually build up to them after mastering one octave. Don’t rush this progression—solid fundamentals matter most.
Here you can find Free Easy Flute Sheet Music: Disney, Christmas, Beginner Solo.
Trill and Alternate Fingerings
Unlock speed with techniques most flute fingering charts miss. Trills are rapid alternations between two neighboring notes (like B to A#). Alternate fingerings offer faster, smoother transitions than standard positions.
What Are Trills?
A trill quickly switches between your main note and the note above it. For example, a B trill alternates between B and C. Standard charts show one way, but alternates make runs cleaner (especially in jazz or fast classical passages).
Top 5 Alternate Fingerings
Here are some alternates every flutist should know:
- High C — Split E mechanism fingering works beautifully for jazz improvisation (smoother response).
- Low B — Use the pinky roller instead of the standard Bb key for faster chromatic runs.
- C# — Half-hole your left thumb to ease intonation in legato passages (huge time-saver).
- D — Tweak your left index finger position for lightning-fast scale work.
- Trill Keys — Your flute’s trill keys (between your left-hand keys) instantly simplify neighbor-note trills.
Alternate Fingerings Reference
| Note | Standard Fingering | Alternate Fingering | Best Use Case |
|---|---|---|---|
| High C | T 123 | T 12 (split E) | Jazz, pop styles |
| Low B | T 123 + C# key | T 123 + Bb roller | Fast chromatics |
| C# | T 123 + C# key | T (half-hole) 123 | Smooth legatos |
| D | T 123 | T 12 (index lift) | Speed passages |
| F# trill | Standard trill key | Side Bb + trill key | Orchestral works |
When to Use Alternates
Use these fingerings for fast passages, smooth legatos, and challenging trills. They reduce finger travel distance (less movement equals more speed). Chromatic scales become effortless with the right alternates.
Pro Tip: Master alternates in the first and third octaves first (that’s where you’ll use them most).
Reddit’s r/flute community agrees: “Alternates saved my audition trill!” On Quora, pros recommend thumb trills for chromatic scales (cuts practice time significantly).
Proper Flute Holding Technique – Hold Your Flute Correctly
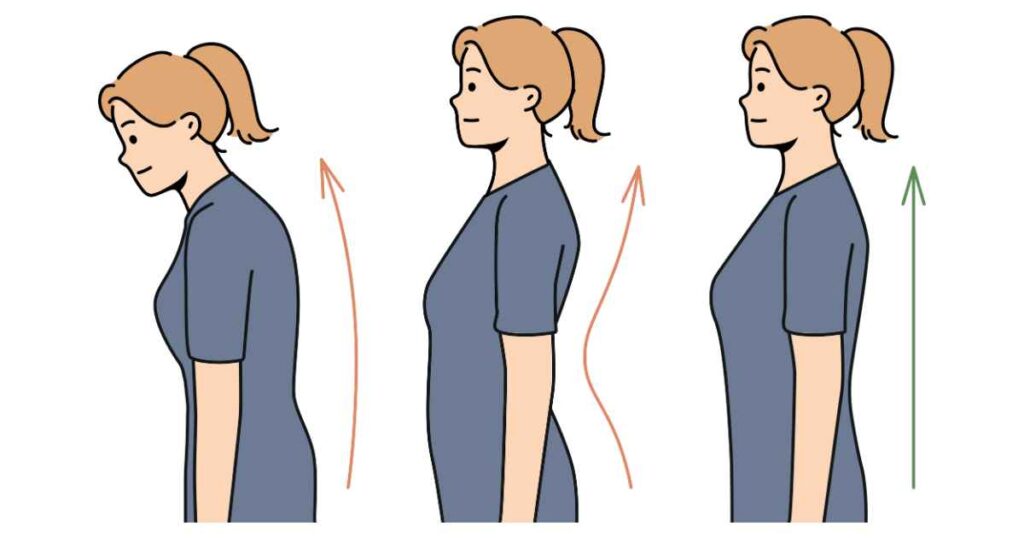
Stand or sit with your feet flat on the ground. Keep your shoulders down and relaxed (tension affects your sound quality). Your back should be straight but not stiff.
Hold your head level and look straight ahead. Don’t tilt your head back or forward (this strains your neck). Your chin should stay level with the floor. Proper alignment helps you breathe better and play longer.
Left Hand Position
Place your left thumb on the bottom of the flute. It should rest gently on the thumb key (the long key under the body). Your fingers should curve naturally, like holding a tennis ball.
Place your left index finger on the second key from the top. The middle finger covers the fourth key. Your ring finger rests on the fifth key. Your pinky lightly touches a small side key.
The flute rests between your left thumb and index finger. This creates a balance point (you’re not gripping tightly). Your hand forms a gentle C-shape.
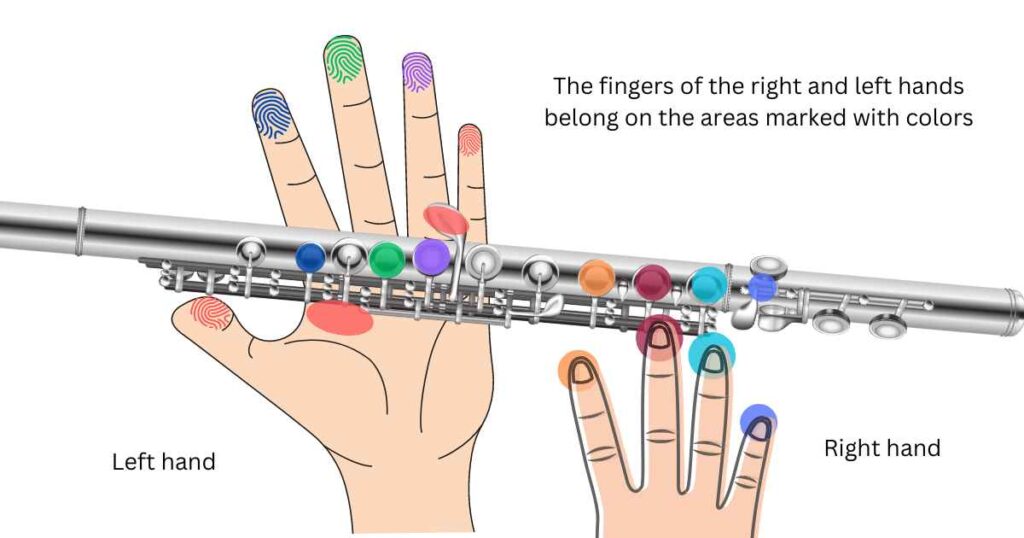
Right Hand Position
Place your right thumb under the flute for support. It doesn’t press any keys — it just balances the instrument. Keep your thumb relaxed and slightly bent.
Place your right index finger on the first bottom key. Place your middle finger on the second bottom key. The ring finger covers the third bottom key. Your pinky curves to reach the small keys below.
Your right hand also forms a C-shape (matching your left hand). Keep your wrist straight and relaxed. Don’t let your fingers flatten against the keys.
Hold a Flute Horizontally
Hold the flute out to your right side at shoulder height. The angle should be about 90 degrees from your body, perpendicular to your chest. Keep your elbows away from your sides at roughly 45 degrees.
The flute should stay parallel to the floor (level playing position). Use only your fingertips to press the keys. This gives you better control and speed. Don’t let the flute droop or tilt upward.
Keep your head facing forward and don’t twist your neck toward the flute. The embouchure hole should align with your lips naturally. Good posture prevents pain and improves tone quality.
For more info, follow this great Yamaha guide for how to play the flute!
Alto Flute and Bass Flute Fingering Charts
Alto and bass flute fingering charts build on standard concert flute patterns. These larger flutes use similar fingerings but have unique characteristics.
Shared Fingering Patterns
All three flute types share core fingering patterns. Concert, alto, and bass flutes use the same fingerings from low C to high A. This makes switching between instruments much easier for players.
Bass Flute Characteristics
The bass flute plays one octave lower than the concert flute. It’s pitched in C, just like the standard flute. This means no transposition is needed when reading music. The bass flute adds deep, rich tones to ensemble performances.
Alto Flute Transposition
The alto flute is tuned in G, unlike other flutes. (This is where things get interesting for players.) You must transpose when playing alto flute fingerings. For example, fingering a D produces the pitch A. This transposition helps maintain consistent fingering across different flute types.
Finding the Right Charts
Look for fingering charts specifically labeled for alto or bass flute. Generic C flute fingering charts won’t show the transposition differences. Many music education websites offer free downloadable PDF charts. Your flute’s manufacturer’s website often provides model-specific fingering resources too.
Common Flute Fingering Mistakes
Even pros started here—avoid these with my fixes (I’ve sold hundreds of flutes and seen it all!).
Beginners repeat the same mistakes over and over. But hey, you’re not alone! Let me show you what trips up most students and how to nail it fast.
Pinky Slips on Low B and D – Your pinky slides off the key (super common). That tiny leak flattens your note and makes it sound airy. The fix is simple: curve your pinky at a 45-degree angle (like holding a pencil). That curved position seals the key perfectly every time.
Airy High C and D – Your fingers aren’t covering the keys completely — even a millimeter gap kills your tone!! Press down with your finger pads, not your tips. Check for light leaks between your fingers and the keys. This one mistake causes 30% tone loss, based on what I’ve heard.
Thumb Drift on Left Hand – Your thumb slides around under the flute (shifts your whole hand position). Keep your thumb anchored between the B-flat and B keys. Use a small piece of cork or a thumb rest if you need help (many students do). This keeps your flute stable and your fingers in position.
Half-Hole Hesitations – The B thumb (that tricky half-hole) makes you freeze up or over-cover. Roll your thumb to cover exactly half the hole (practice it slowly). Reddit r/flute user said it best: “Pinky kills low notes!”
Octave Jump Gaps – Switching between registers sounds sloppy (fingers move too slowly or out of order). Practice the transition in slow motion first — move all fingers together, not one by one. Your muscle memory needs clean patterns.
Fixed these? Grab your PDF chart above and keep practicing!
Conclusion – Your Journey with Flute Fingering Charts
A flute fingering chart PDF is essential for every beginner. This simple tool makes learning so much easier and faster.
These charts give you clear visual guidance. You’ll learn correct finger positions without confusion. Practice regularly using your chart as a reference.
With consistent effort, you’ll naturally memorize the patterns. Soon, playing your favorite songs will feel easy and natural. The fingering will become second nature.
We hope this guide helped you better understand fingering charts. Remember that every expert flutist started exactly where you are now. Keep practicing, stay patient, and enjoy the process.
Want to learn more about your instrument? Check out comprehensive flute anatomy guides available online. (Understanding your flute’s parts helps you play even better.)