Trumpeter 5 First Steps: How to Hold a Trumpet Like a Pro!

Oh! So, you have committed to learning to play the trumpet! Well done — join Louis Armstrong and Miles Davis as some of jazz music’s great musicians! Congratulations on making such an important step towards great jazz musical career success.
As a beginner trumpet player, one of the first things you must learn is how to hold a trumpet. Your trumpet playing grip improves sound quality and can help avoid strain or injuries during playing sessions.
Do not underestimate its power — even seemingly simple tasks have hugely positive results on both sound quality and technique!!
Holding Your Trumpet Properly — Benefits and Considerations
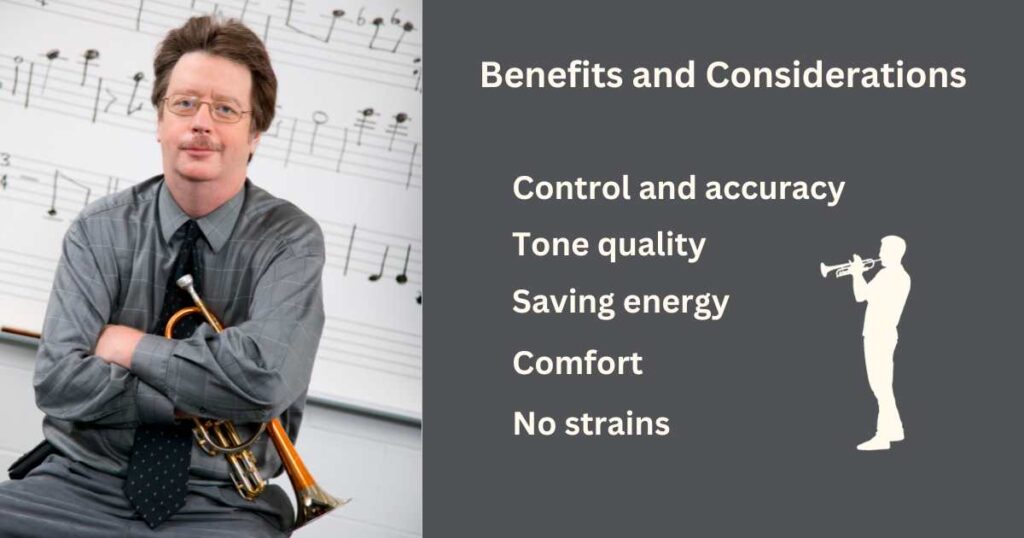
Holding your trumpet properly has multiple advantages.
- Control and accuracy — An effective grip makes your fingers quickly access valve keys to hit each note with precision and ease.
- Intonation and tone quality — Get the right intonation and tone quality with the correct hand placement. You make the sound of your music more pleasing, improving soundscape quality.
- Saving energy and playing longer — Holding the trumpet the right way conserves energy so that you can play for longer without becoming tired.
Below I provide several points to keep in mind when learning how to hold a trumpet:
- Comfort — Make sure that the trumpet fits comfortably within your hands. Remember that each body type differs significantly, no need to copy someone else if it doesn’t feel natural to you.
- Relax — Keeping the muscles relaxed is absolutely key for creating quality sounds and avoiding injuries. Don’t tense your shoulders and arms as that could hinder sound production!!
- Practice makes perfect — You may feel awkward holding the trumpet at first. But with practice, it will quickly become second nature!!
Check out my guide of 15 Most Important Trumpet Parts – Ultimate Trumpet Anatomy Guide
Let’s dive in to discuss proper hand positions for both left and right hands.
The Left Hand
Step 1: Left Thumb
To start out, extend your left hand with your thumb slightly separated from other fingers and place in on either the first valve slide thumb rest or wrap it around its casing (if your trumpet lacks one ).

This valve slide (with a thumb rest) tunes notes played with the first valve by slightly adjusting it if necessary to correct its pitch.
Step Two: Left Fingers
Locate your left finger ring near the valve casings — it looks like three connected vertical tubes — as this controls your third slide valve to correct out-of-tune notes.
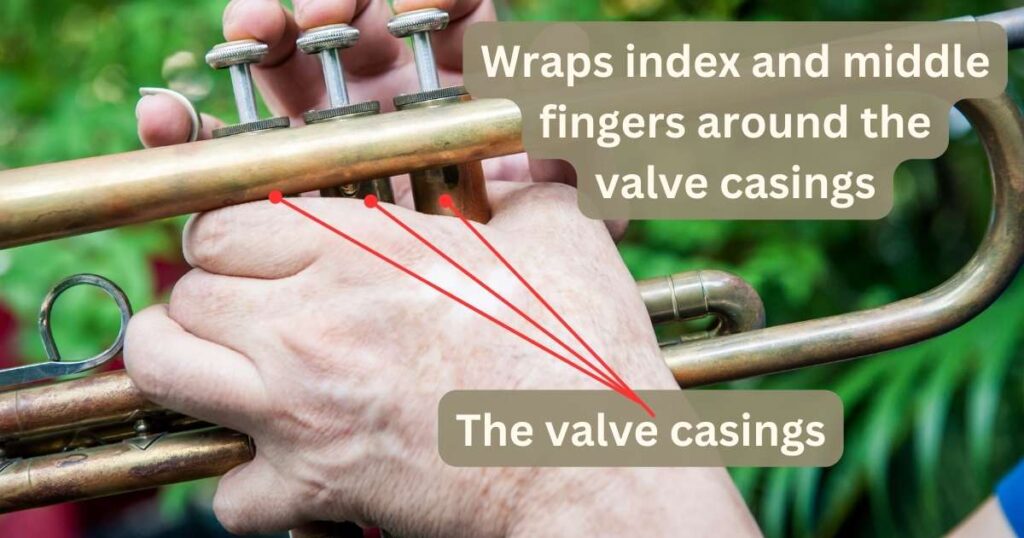
Stretch your left hand’s index, middle, and ring fingers across all three valve casings so your index finger wraps around the last one (the third!).
Keep your left index and middle fingers around the valve casings, resting them against your left ring finger — your left-handed fingers will work to support its weight.
Step Three: Third Valve Slide Ring For Your Left Ring Finger
You can find a trumpet’s third valve ring next to its third valve casing. Controll your third valve slide to tune the third valve – adjust the valve to get rid of sharp or flat notes.
Most adults use the ring finger as the most suitable when operating third valve rings.
If your hands are large enough, rest your pinky under the third valve slide; for smaller hands — tuck it inside instead.
Notes to Keep in Mind
Minimize contact with the trumpet by not placing your left palm directly on its valve casing. Doing so could prevent the correct operation of its slide valves, resulting in poor intonation and slow finger movement!
Your left hand provides most of the support for the trumpet; your right hand works on valves depressing and pitch controls. Grip it tightly with your left hand to ensure support for your trumpet.
Check out these 15 Beginner Tips to Begin Playing the Trumpet
Right Hand
Your left hand holds up the trumpet while using the index, middle, and ring fingers of your right hand to operate its valves.
Now, we will learn to correctly position and use the right hand — it is responsible for altering sounds.
Step Four: Right Thumb
You should experiment with various positions for your right thumb finger to find one that feels the most supportive and comfortable for you.
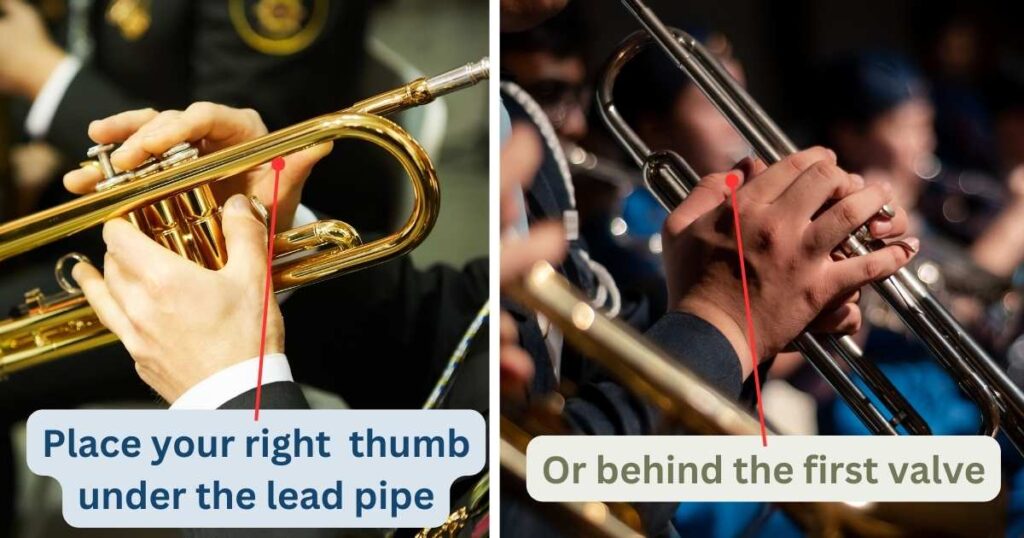
Try resting your right thumb between the first and second valve casings or behind the first valve.
Some instructors suggest resting it against the first valve casing instead — give it a try and see what works best!!
Another option — place your right finger under the lead pipe to help carry some of the weight of the trumpet and maintain an upright posture. Doing this may even reduce tension in your arms!
Don’t bend your thumb too much (ideally not at all!) so other fingers have plenty of room for movement.
Step Five: Right Fingers
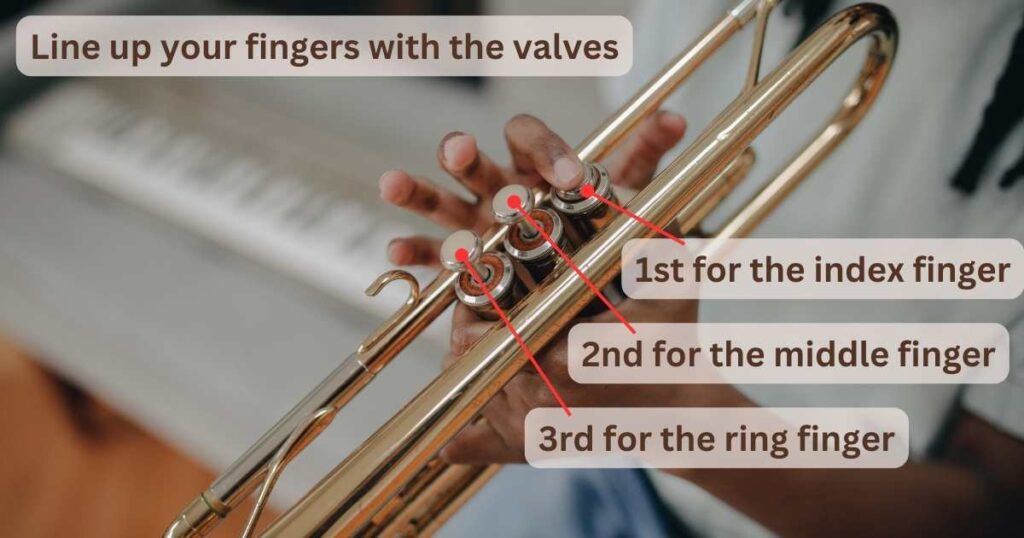
Line up your index, middle, and ring fingers with the valve finger buttons.
Your fingers should rest atop each valve (starting from the mouthpiece):
- Index finger — the 1st valve cap
- Middle finger — the 2nd valve cap
- Ring finger — the 3rd valve cap
Press these keys to alter airflow and create different notes. When not depressing keys, rest your fingertips on valve finger buttons — taking care not to rest the right pinky finger hook!
Ring Finger
Putting your right pinky finger on a finger hook restricts your fingers’ movements. You want to avoid that and let your fingers move freely. It’s fine for turning a page or grabbing a mute, but only for that.
Curve the fingers on your right hand into a “C shape”. Doing this keeps your hand flexible and makes playing faster. Start practicing this early, so it becomes an ingrained habit — otherwise, breaking old ones later is much harder!!
Do not press hard on or grip tightly onto valve finger buttons — instead, relax your right wrist. An overly rigid wrist can make pressing valves difficult and lead to discomfort.
How To Hold a Trumpet: Easy Tips for Beginning Players
Avoid Excess Pressure When Pressing Valves
Use your right hand to hold down each valve — one at a time. Press down firmly and evenly, and focus on building strength and coordination. Begin slowly but increase pace once comfortable.Apply just enough pressure with your fingertips of the right hand to keep valves under control. Don’t squeeze your left hand too hard — it limits finger movement and causes muscle tension.
Chromatic Scales and Arpeggios
Play chromatic scales moving from low to high (or vice versa). Practice arpeggios using various patterns and fingering options. Both exercises strengthen finger independence and control.
Check out my post for Printable Trumpet Fingering Charts and Beginners Sheet Music
Regular Breaks And Hand Position Awareness
Prevent fatigue in your right hand during practice sessions and performances — take short breaks at regular intervals to give yourself time for stretching exercises. Monitor for any tension or discomfort and make adjustments when necessary.
How to Hold a Trumpet With Proper Posture
Your posture while playing the trumpet – standing up or sitting down – influences its feel and sound.
Because your posture affects breathing patterns — something important when making sounds on trumpet.
Be Straight Playing Trumpet Standing or Sitting
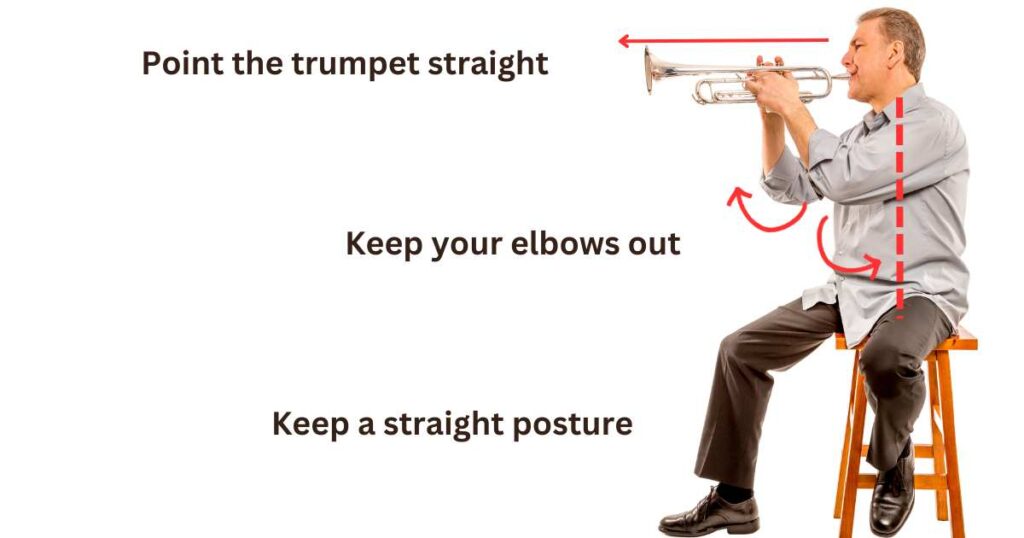
Make sure that when playing trumpet, you maintain good posture at all times. Whether standing or sitting, keep a straight posture for maximum airflow control – anything else makes playing long notes complex while controlling volumes more challenging.
Just stand up straight with feet approximately shoulder width apart, or sit with a straight back on the chair edge, shifting weight onto your feet.
Keep Your Shoulders Relaxed And Elbows Out
Relax your shoulders and maintain good posture when sitting or standing — doing this can help improve breath control and help avoid neck pain. Remember to take deep breaths so you can fill all your lungs fully.
Raise your ribcage to take deeper breaths while your shoulders remain relaxed and down. Avoid tightening shoulders by taking deep, full breaths until the lungs have been completely filled up with air.
Keep your elbows out from your body (without tucking them) to reduce strain and improve airflow. A relaxed yet natural angle of arms gives the ribcage enough room to expand and contract freely for optimal sound production. Correctly held arms should form a right angle with your forearms in front of you.
Keep The Trumpet Straight
For optimal sound projection and airflow, point the trumpet straight ahead with the valve casing vertically. Lift and keep a straight head position with your trumpet raised above — this way your throat remains open, providing easy airflow.
Do not point the bell towards the floor or rotate an instrument, as this limits airflow and affects the pitch and volume of your performance. Be careful of dropping your head or stretching your throat muscles — this could obstruct air passage (making playing even harder!!)
Learn How To Hold a Trumpet with Online Lessons
Online trumpet lessons provide many advantages over traditional lessons. Their flexible scheduling enables skill improvement at any time during your morning, daytime or nightly routine. Online lessons often cost less while offering access to high-quality learning materials.
Remote trumpet lessons provide interactive learning through videos, audio recordings, and printable docs — offering more benefit to students than traditional classroom teaching methods. Visual learners can watch demonstration videos that detail techniques. Pause lessons at any point to ask questions or receive feedback on your playing ability.
Online trumpet lessons provide you with a quiet environment to build confidence and increase focus, perfect for students wanting to pursue music as an individual pursuit.
With online trumpet lessons, you can reach top instructors worldwide — including musicians performing in leading bands and orchestras. Gain valuable insight from highly accomplished trumpet players working within the music industry.
Online trumpet lessons give you more control of the curriculum. Through virtual learning, choose the level, content and pace that works for you — skip sections that don’t interest or challenge you and focus on those areas where there may be difficulty.
Conclusion – How to Hold a Trumpet Correctly
Simply keep a relaxed but natural posture, keep it straight up (standing or sitting), have a relaxed yet firm grip, and remain under control at all times — with practice, you will get used to it!
Become comfortable holding and making sounds with the trumpet, then push yourself further with more challenging pieces (chromatic scales, arpeggios and alternative fingerings). Take it slowly and pay close attention to posture and hands (and elbows) position.
Take care of your trumpet properly — regularly clean and store it in the right conditions (avoid extreme temperature and humidity)!!
Most importantly, enjoy yourself – Music should be enjoyed!!