Flute Embouchure: 7 Top Tips to Develop A Strong Technique

Flute embouchure is how you shape your lips and blow air into the flute. Your embouchure is the foundation of your sound because it affects how your flute sounds.
Think of embouchure as learning to whistle. At first, you might just blow air. But with practice, you’ll be whistling tunes in no time.
Remember, when first start playing, your flute embouchure will sound like a squeaky door!
A good embouchure makes your sound smooth and sweet. When you get it right, your flute will sing like a bird.
Flute embouchure helps you use your air more efficiently. No more running out of breath in the middle of a song! With a good embouchure, you can play longer phrases without gasping for air.
Quick Pro Tip: Don’t forget to breathe!! Proper breathing is the backbone of a good embouchure. So, take a deep breath, relax, and let’s get started!
Every great flutist started somewhere — even the famous ones!! Stick around, and I’ll share the 9 best tips to help you develop a strong flute embouchure.
Understanding the Basics of Flute Embouchure
Your bottom lip should cover about a third (up to a half) of the embouchure hole. Think of it like you’re tryin’ to hide a tiny secret with your lip. Relax your top lip, but keep it firm.
The opening between your lips is called the “aperture” (from the Latin ‘opened’ or ‘to open’). Keep it small and oval-shaped (not a circle!!). Imagine you’re whistling, but quieter. The shape of your aperture affects your tone. Think of the aperture as blowing through a straw.
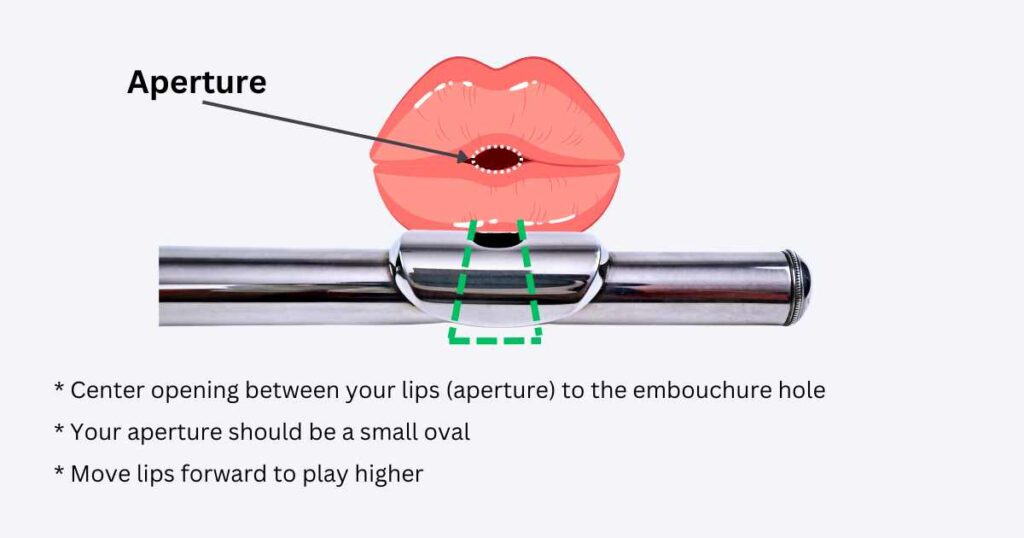
Aim your air stream down and across the hole, like blowing across a bottle to make a sound. The speed and direction of your airstream are important.
Faster air = higher notes, slower air = lower notes—it’s science!
A common mistake is blowing harder for a better sound. Nope, that’s not how it works! It’s all about finesse, not force.
Believe it or not, your posture matters, too. Keep your head up and shoulders relaxed. Do not hunch over or play with your head down. Slouching messes with your airflow, so sit or stand straight!!
Looking for a flute fingering chart? Check my “Flute Fingering Chart PDF: Best Beginner’s Guide“
Tip 1: Practice Without Flute First
These techniques teach you how to control your air stream, shape your aperture, and build muscle memory — all without touching your flute.
Grab a mirror for these exercises. Watch how your lips form and adjust until they look just right. The mirror helps you see if your lips are in the correct position.
The “Pooh” Technique
Start with the “pooh” technique! Form your lips like you’re saying “pooh”. This shape creates the perfect oval flute embouchure. Your lips should stay relaxed but firm. Blow the air in a focused stream, like a laser beam (NOT a hurricane!!)
You want a relaxed pout, kinda like you’re about to say “pooh”. Your bottom lip should be a bit flat, and your upper lip should hang over it just a smidge.
Spitting Seeds/Rice Exercise
Imagine tiny watermelon seeds or rice on your tongue. Spit them out without using your tongue to push them.
Do not tongue through your lips during this exercise! Focus on using your air to blow out those imaginary seeds.
Palm Blowing Exercise
Hold your palm about six inches from your mouth. Blow air onto it while forming your flute embouchure. You should feel a cool, focused stream of air — not a warm, diffuse breath!!
Adjust your embouchure size and notice how the feeling changes on your palm. A smaller aperture creates more pressure. A larger one lets more air flow but with less direction.
Experiment with the direction of your air stream. Adjust your jaw position and upper lip slightly. The air should hit different parts of your palm as you make changes.
Once you feel comfortable with these exercises (usually after a week or so), apply them to your headjoint.
Tip 2: Start with the Headjoint Only
First things first, focus on the headjoint — the top part of the flute. Practice with only the headjoint to concentrate on your flute embouchure without holding the whole flute.
Grab the headjoint and forget about the rest of the flute for now. Your job is to make a clear sound with JUST this part. Play around with your lip shape (aperture) and air direction.
Don’t move on to the full flute until you’ve got the headjoint down pat!
Practice with the headjoint every day. Find a comfy spot and get to work.
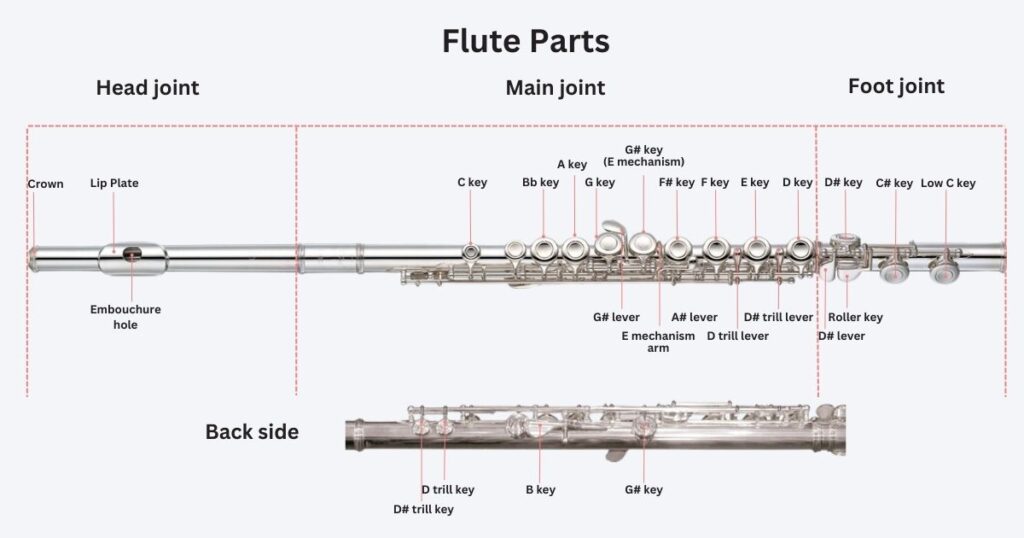
Want to know more about flute parts? Read “Flute Full Anatomy Guide: What Are the Different Parts of a Flute? “

Hold the headjoint horizontal up to your lips. You want the bottom of the embouchure hole to line up with your lower lip, where your bottom lip starts getting pink.
Cover about a third of the embouchure hole with your bottom lip. Covering too much of the hole can muffle your sound.
Don’t press too hard or cover too much of the hole — you’ll end up soundin’ wheezy.
Make a tiny oval opening between your lips. Aim your air across the hole, NOT straight into it!! Adjust your air angle if you hear just air:
- Move the headjoint slightly up or down.
- Shift your lips a bit forward or back.
- Tiny changes completely change the sound.
Think of saying “pew” or “pooh” to shape your aperture. Adjust your lips and breath until you get a clear, steady tone.
Looking for a flute? Read my “13 Best Flute Brands – Ranked And Reviewed“
Tip 3: Using a Mirror for Self-Correction
A mirror is like having a teacher 24/7! Watch yourself play to catch mistakes you do not feel, like uneven lips or a tense jaw.
Grab a mirror and plop it on your music stand. No need for anything fancy — a small one’ll do the trick!
Look for your lip placement — remember to cover one-third of that embouchure hole with your bottom lip. Keep an eye on your jaw tension, too — keep it relaxed!
Control the shape of your aperture. Aim for a small oval, NOT a big/perfect circle. Think of “laser beam,” NOT “firehose”!

Notice how your lips move when you change notes. Are they staying relaxed or getting tense?
Try playing different dynamics, too! Watch how your flute embouchure changes when you go from soft to loud. This visual feedback is super helpful for your technique.
Stand up or sit tall, but keep that spine straight! To check your posture, stand in front of a full-length mirror! It makes a huge difference.
Don’t go mirror-crazy. Use it for quick checks, then focus on how it feels and sounds.
Tip 4: Avoid the Smiling Embouchure
The “smiling embouchure” creates unnecessary tension in your lips, which messes up your airflow and weakens your sound.
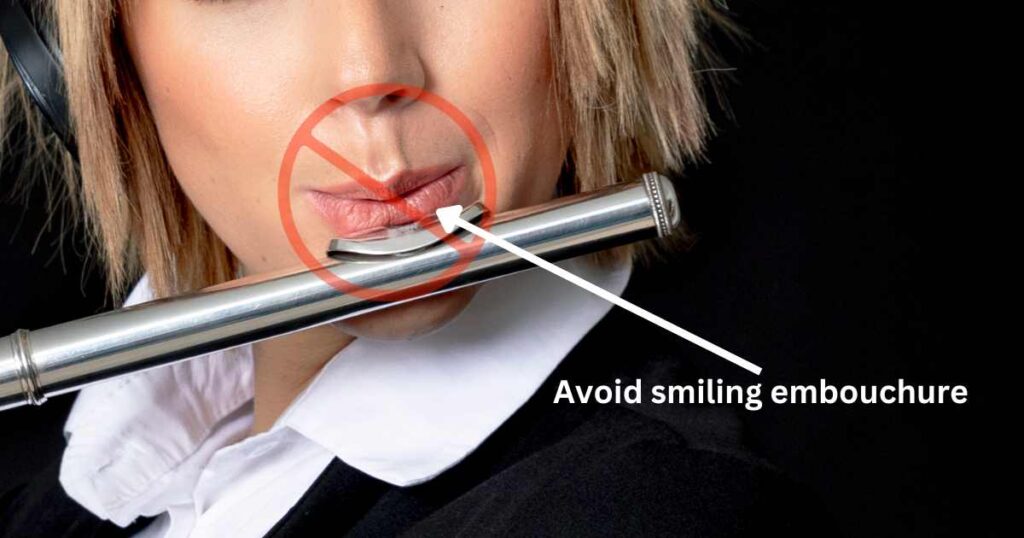
When you pull those lip corners back into a grin, you’re basically puttin’ the squeeze on your sound.
Smiley biz is a major buzzkill for your tone!
Instead, think of “pouty lips” (like you’re saying “moo” or “poo”) – keep those corners relaxed and slightly down.
Peep yourself in the mirror without your flute. Notice how your lips look all natural and relaxed? Use that same energy when you bring your flute up to play.
A relaxed flute embouchure = more flexibility = better sound!
Practice in front of a mirror to ensure your lips aren’t tight or pulled back!
Tip 6: Avoiding Tension in Your Jaw and Lips
Tension in your jaw or lips messes up your flute embouchure. It’s like trying to whistle with a stiff upper lip — not gonna work!
Learn to relax and play for HOURS without getting tired! Stand tall with your shoulders back. Good posture helps reduce face strain.
Do some face yoga! Before you start playing, try a little face massage. Stretch those cheeks and wiggle that jaw.
We’ve also got flute gymnastics. Grab a straw or pencil and hold it with your lips. No cheating with your teeth!! Keep it parallel to the floor for about 30 seconds. Do this a few times daily.
Next, try some bottle blowing. Find an empty bottle, blow across the top, and aim for a clear whistling sound. Practice this for a few minutes each day. It’s great for improving your airflow control!
Here’s a fun one – rice spitting! Put a grain of rice on the tip of your tongue. Then, try to spit it out as far as you can. Do this about 10 times. It’s all about precision, a key for a proper flute embouchure.
Tip 7: Lip Flexibility Exercises And Techniques
Daily warm-ups and cool-down exercises help you gain control, endurance, and a richer tone.
Warm up your lips! Start with long tones on middle G. Hold a single note for 10-15 seconds (or as long as you can) and focus on steady airflow and a clear tone. Pro tip: Use a tuner to keep your pitch in check.
Then, jump between low and high notes for “octave jumps“.
Next, do “lip slurs” — start on low C, slur up to G, and back down. Move/slide smoothly between low and high notes without tonguing. This strengthens your flute embouchure muscles over time.
Moving your jaw just a bit changes your sound. Some flute experts (Hammy Hamilton) says: “The angle of your flute embouchure hole should be about 7 degrees for old-school flutes”!
When ya need to jump from a low note to a high note, ya gotta speed up your air and change how you blow into the flute. But instead of just blowing harder, make the hole in your lips (aperture) smaller. This forces the air through a smaller space, making it go faster without playing too loud!!
Conclusion: Mastering Flute Embouchure Takes Time and Patience
Don’t expect a perfect flute embouchure right away. Mastering flute embouchure is practice, practice, practice!
Practice saying “pew” or “pooh” to shape your lips. Try blowing through a pen cap to focus on controlling your aperture. And don’t give up — grab your flute, practice daily, and see how it goes!